
WinRM & Ansible –
Ways of authentication and encryption
With Ansible, you can configure a variety of systems in an easy way. Most companies use it to manage their Linux-based systems.
For Windows based systems this practice is not yet very common. The use of Ansible on Windows is still an exception. However, the hurdle for system administrators to use it is more in the mental than the technical area. Because Windows has everything necessary to be configured and managed with Ansible. With the tool “WinRM”, which is included in Windows, this is easily possible and without additional software installations.
In this blog entry, we would like to show you which authentication options Ansible uses to log on to Windows systems. In addition, options for encrypting communication are shown.
Options for authentication and encryption
Three options for authentication and encryption will be briefly introduced here:
On the target system, a local user is used for logon. Passwort und Daten werden unverschlüsselt über HTTP übertragen.
A domain user account is used for registration. Authentication takes place via Kerberos. The user data is still transmitted unencrypted via HTTP.
3: Certificate based authentication
A prerequisite is that the target system has its own server certificate. In this case, both the logon and the data are transferred encrypted via HTTPS.
Requirements
- A Windows 2016 or 2019 server with running WinRM service
- Firewall activations for the ports “TCP 5985 (HTTP)” and “TCP 5986 (HTTPS)
- An Ansible “Master” server. For Example: CentOS 7 with WinRM (pywinrm) module installed
- An Ansible Test Script / Role. For example:
main.yml
---

- name: Test

hosts: all

tasks:

- name: Get WinRM Config

win_shell: winrm get winrm/config/service

register: output

- debug: var=output.stdout_lines
Basic Authentication
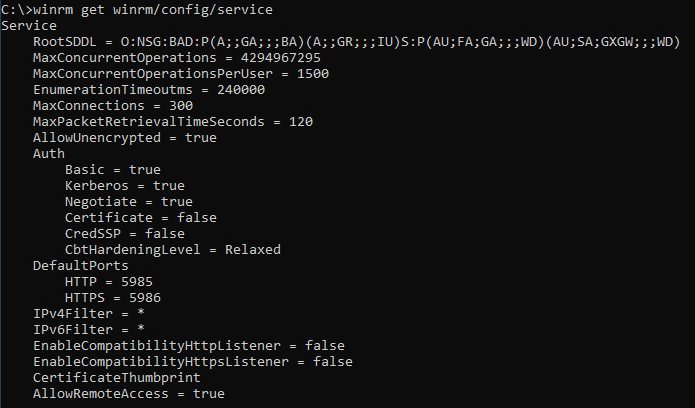
With a standard Windows installation the WinRM service is automatically installed and started. The WinRM configurations “Auth BASIC” and “AllowUnencrypted” are set to TRUE. Therefore, no initial adjustments are necessary.
Nevertheless it is useful to check the settings.
Command on the Windows host:
C:> winrm get winrm/config/serviceOutput:
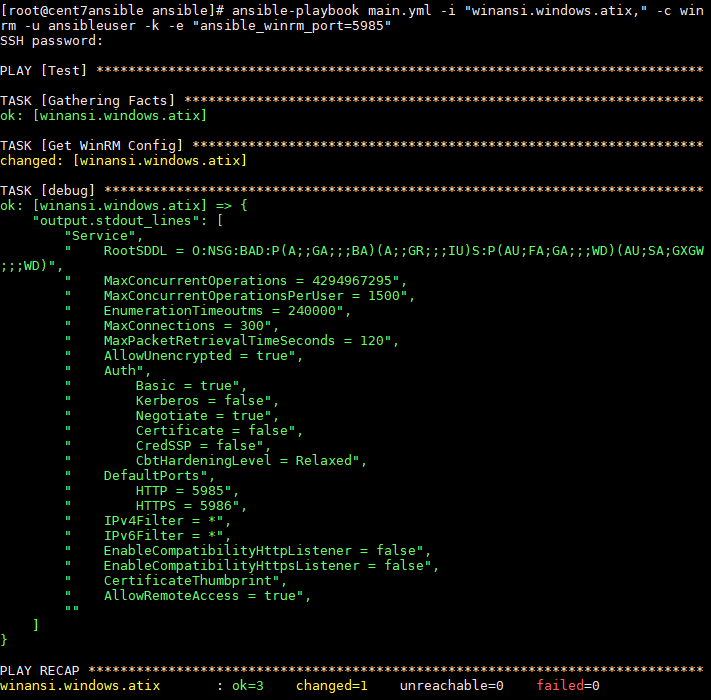
Thus the test script can be directly used on the Ansible Server against this host.
Command on the Ansible Server:
# ansible-playbook main.yml -i "winansi.windows.atix," -c winrm -u ansibleuser -k -e "ansible_winrm_port=5985"Output:
Domain User Authentication
Prerequisite for this type of authentication is an AD (service) user. This user must be added to the group of local administrators on the target system.
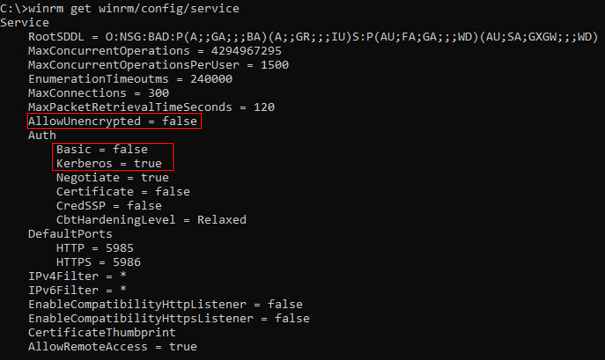
Furthermore it must be ensured that the WinRM configuration “Auth Kerberos” is set to TRUE and “AllowUnencryptet” is set to FALSE.
Commands on the Windows host:
C:> winrm set winrm/config/service @{AllowUnencrypted="false"}
C:> winrm set winrm/config/service/auth @{Basic="false"}
C:> winrm set winrm/config/service/auth @{Kerberos="true"}
C:> winrm get winrm/config/service
Output:
On the Ansible Server (CentOS), the Kerberos Library must be installed and configured.
Installation:
$ sudo yum install gcc python-devel krb5-devel krb5-workstation python-devel
$ pip install pywinrm[kerberos]
Customizing the krb5.con:
# vi /etc/krb5.confkrb5.con:
# Configuration snippets may be placed in this directory as well
includedir /etc/krb5.conf.d/

[logging]
 default = FILE:/var/log/krb5libs.log
 kdc = FILE:/var/log/krb5kdc.log
 admin_server = FILE:/var/log/kadmind.log

[libdefaults]
 dns_lookup_realm = false
ticket_lifetime = 24h
 renew_lifetime = 7d
 forwardable = true
 rdns = false
 pkinit_anchors = /etc/pki/tls/certs/ca-bundle.crt
 default_realm = WINDOWS.ATIX
 default_ccache_name = KEYRING:persistent:%{uid}

[realms]
WINDOWS.ATIX = {
  kdc = kerberos.windows.atix
  admin_server = kerberos.windows.atix
 }

[domain_realm]
 .windows.atix = WINDOWS.ATIX
 windows.atix = WINDOWS.ATIX
Note:
The blue lines must be adjusted. It is imperative to pay attention to the upper and lower case. It is imperative to pay attention to the upper and lower case.
Testing Kerberos on the Ansible Server
kinit -> Initiates a session (example: kinit ansiblead@WINWODS.ATIX)
klist -> Shows a list of current Session Keys

kdestroy -> deletes the list of current sessions
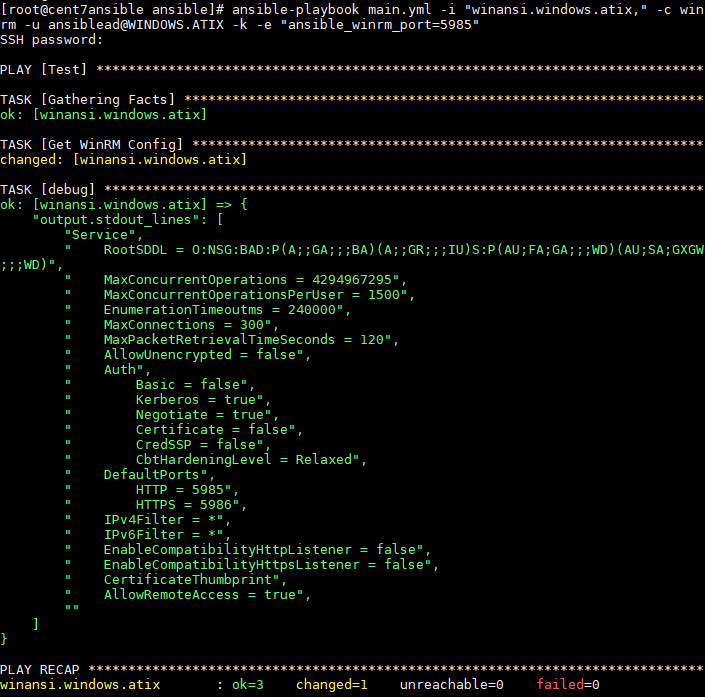
After the Kerberos configuration is set up, the Ansible Authentication can run over it.
Command on the Ansible Server:
ansible-playbook main.yml -i "winansi.windows.atix," -c winrm -u ansiblead@WINDOWS.ATIX -k -e "ansible_winrm_port=5985"Output:
Certificate-based Authentication
The prerequisite for this is a functioning Kerberos authentication.
Furthermore, the target system / server must have a server certificate.
To create a self-signed certificate on the Windows host and set up the WinRM Listener, the following three powershell commands are required.
1: Create Certificate (creates the self-signed certificate with the FQDN and a FriendlyName)
New-SelfSignedCertificate –DnsName ([System.Net.Dns]::GetHostByName($env:computerName)).Hostname -CertStoreLocation “cert:LocalMachineMy” -FriendlyName Ansible2: Retrieving the certificate thumbprint (reads the certificate thumbprint)
$dump = Get-ChildItem Cert:LocalMachineMy | where FriendlyName -eq Ansible | select Thumbprint3: WinRM HTTPS Listener erstellen (erstellt einen WinRM HTTPS Listener mit FQDN und Thumbprint)
New-WSManInstance -ResourceURI winrm/config/Listener -SelectorSet @{address="*";transport="https"} -ValueSet @{Hostname=[System.Net.Dns]::GetHostByName(($env:computerName)).Hostname;CertificateThumbprint=$dump.thumbprint}TIP:
If no CA-signed server certificates are distributed in the Windows network, e.g. via a group policy, the above-mentioned three-line script can be packed into a powershell script and executed automatically in the deployment of the Windows servers.
Whether the listener was entered correctly can be checked with the following command.
C:> winrm e winrm/config/listenerFinally the WinRM configuration “Auth Certificate” must be set to TRUE.
C:> winrm set winrm/config/service/auth @{Certificate=“true“}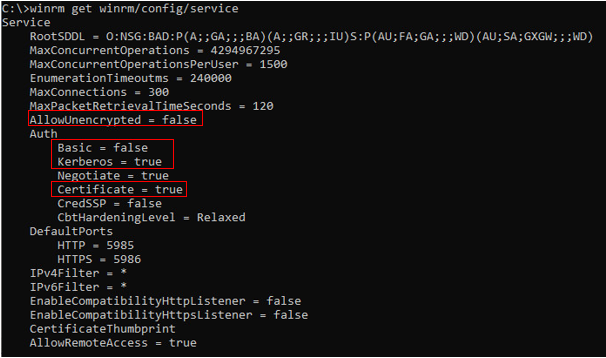
After all configurations are set up, the Ansible Authentication can now run over it.
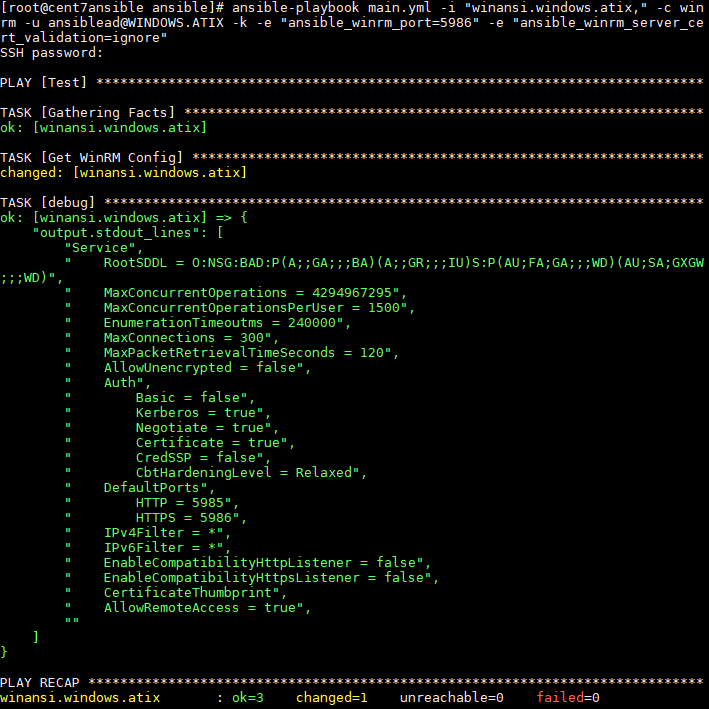
Command on the Ansible Server:
ansible-playbook main.yml -i "winansi.windows.atix," -c winrm -u ansiblead@WINDOWS.ATIX -k -e "ansible_winrm_port=5986" -e „ansible_server_cert_validation=ignore“Output:
Conclusion
The “BASIC Authentication” method is quick and easy to set up. For productive environments, it is recommended to at least do the authentication via Kerberos. The encryption of communication with server certificates via HTTPS should be used at the latest when communication between master and client goes beyond the secure internal network.
Other authentication options not discussed in this article are CredSSP and authentication using user certificates. More information on this topic can be found on the official Ansible website “https://docs.ansible.com/“.


")