orcharhino meets Windows (Windows Network Deploy)
Since Version 4.5.0, orcharhino also enables Windows installations. This means that in addition to numerous Linux derivatives, all newer Windows versions from “Server 2012” onward can be installed and managed with orcharhino.
orcharhino offers basically two ways to create a host system: The Bare Metal Installation (complete new installation with network boot) and the Image Base Installation (e.g. using a VMware template with pre-installed OS).
The finished Windows Host can be created at the push of a button. However, the following questions must first be answered:
- How is a universal Windows boot image created and what should I be aware of?
- How do I get orcharhino to boot into a Windows boot image and install the final OS?
- How is automatic customizing created for Windows (Unattended Installation)?
The answer: Universal Windows Boot Image
Microsoft offers a free tool to easily create a Windows boot image. The Microsoft ADK (Assessment and Deployment Kit) is available as an open-source download.
After installing the kit, a rudimentary WinPE 64Bit boot image is created with the command “copy amd64 c:”winpe“.
Figure 1 – Initial Creation of the WinPE Boot Image
This simple boot image can be extended according to your needs. The addition of additional language packages as well as software (e.g. wget) and drivers (network drivers or HDD drivers) is thus possible.
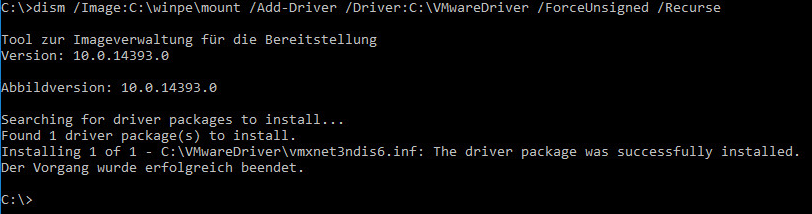
Figure 2 – Example – Adding VMware Drivers to the Image
Important: The more drivers you add to the image, the larger it will be (additional drivers are often several gigabytes in size). The advantage of this is that the boot image can be used both directly on a physical server and on a hypervisor such as VMware or Hyper-V.
With good preparation, this can be used universally for any Windows installation.
Solution: orcharhino boots the universal WinPE image
Two files are required to boot Windows systems. These are located in the orcharhino TFTP folder:
- wimboot
- ipxe.lkrn
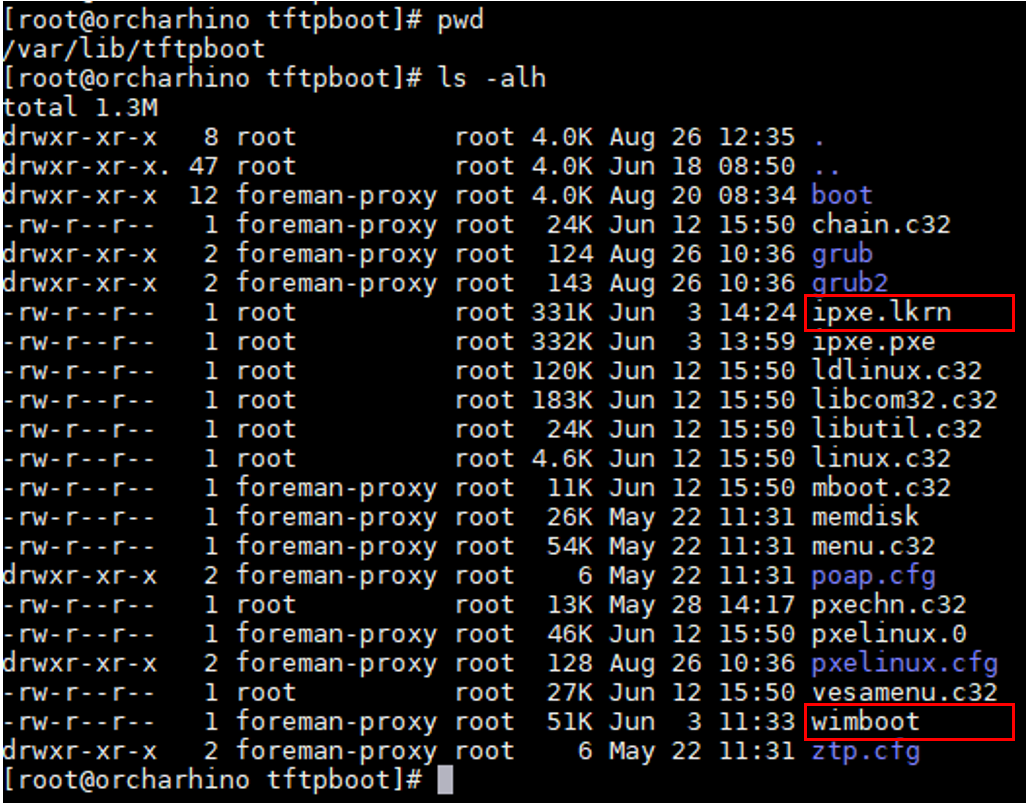
Both files can be downloaded and used from the open-source project iPXE page. Source:ipxe.org
Now it is generally possible to boot the previously created WinPE via TFTP with orcharhino. The necessary orcharhino templates are explained in the following:
After all preparations have been completed, the Windows ISO files are loaded onto the orcharhino and made available via the web (http).
To do this, the original Windows DVD or ISO is mounted on the orcharhino and the complete content is copied into a web directory. For example to: #/var/www/html/pub/images/Windows/{version}
In the last step, the original Windows Boot.wim must be replaced once with the previously created universal boot.wim.
The corresponding orcharhino boot template should have set the type “PXELinux Template” and have the following content.
####################

#!ipxe

default Windows

label Windows

kernel ipxe.lkrn

APPEND dhcp && kernel wimboot && initrd <%= foreman_url("script") -%> win_init.cmd && initrd <%= @host.os.medium_uri(@host) %>boot/bcd BCD && initrd <%= @host.os.medium_uri(@host) %>boot/boot.sdi boot.sdi && initrd <%= @host.os.medium_uri(@host) %>sources/boot.wim boot.wim && boot

####################

Figure 3 – Contents of the PXE Template
After the boot start of the universal WinPE, this automatically attracts another orcharhino template. Here, the hard disk layout can be determined directly or via snippets. Drivers can be reloaded or installed. Furthermore, the definition of the Windows version to be installed is possible here. Currently, the following versions are supported:
- Windows Server 2012
- Windows Server 2016 Core
- Windows Server 2016 Desktop
- Windows Server 2019 Core
- Windows Server 2019 Desktop
- Windows 10 Enterprise
Solution: Windows unattended installation
It is important to know how this mechanism works in Windows. Windows uses a file called “unattended.xml” that must be in the “C:-Windows-Panther” folder when the system is first started.
This XML can be customized via an orcharhino “provisioning template” and passed to the Windows system during boot.
ATIX Example of the Windows Provisioning Template
In this ATIX template the following features are executed during the Windows installation:
- Setting the Administrator Password
- Automatic Domain Join
- Suppressing the installation pop-ups (unattend mode)
- Windows Serial Number / Key Entry
- Setting firewall rules (e.g. Allow WinRM, ICMP Echo, Remote Desktop)
- Setting Remote Desktop Settings
- WinRM configuration. Management via Ansible
- Create User Add “ansible” Separate User for Ansible.
- Create or customize general registry entries
- Installing and configuring Puppet 5
- Configure BGinfo for Windows
Result:
After all preparations have been completed, all orcharhino templates have been created and the corresponding “Installation Media”, “Operating Systems” and “Host Group” have been configured in orcharhino, the first Windows deployment can be started.
On Top:
On September 28, 2019, ATIX has held a webinar on the topic of orcharhino with a focus on Windows installation (incl. live demo). If you are interested, you are welcome to watch this orcharhino webinar on our YouTube channel. In the live chat you can of course also ask us your questions.


")